


Floral Slide & Store Stationery Box – Buildable Wooden Craft Kit
Floral Slide & Store Stationery Box – Buildable Wooden Craft Kit
- Easy to make kits - no stress, just joy
- Every piece is handcrafted to calm busy minds
- Paint, glaze, and watch your design come to life
In stock
Couldn't load pickup availability
- Free UK shipping on all orders over £50
- Estimated delivery time: 3-5 days
Returns Policy
Returns Policy
Refund & Exchange Policy
- If something is incorrect with your order, please contact me at Dee@LMGifts.co.uk
- If you have placed an order and have changed your mind, then you are eligible for a refund under the Consumer Contracts Regulations 2014.
- I can only accept back items that have been unused and are still in all their original packaging (unopened), so they can be resold. Any items that have been damaged or have clearly been used will not be refunded.
- You need to inform me that you'd like a refund within 14 days of receiving the items.
- You then have a further 14 days to return any items to me.
- If your order has already been sent, the postage costs for your order will not be refunded.
- If you cancel your order before it has been packed and shipped the postage cost will be refunded.
- You are responsible for the return postage costs and the safe return of any items.
- I cannot be held responsible for any items lost in the post. I'd recommend using a tracked postal option if the package is of a significant value.
- A refund will then be issued for any unused items returned that are in a resale-able condition within 14 days, refunded back to the same payment method.
- Returns should be sent to
LMGifts by Dee
PO Box 6546
Milton Keynes
MK1 9JF
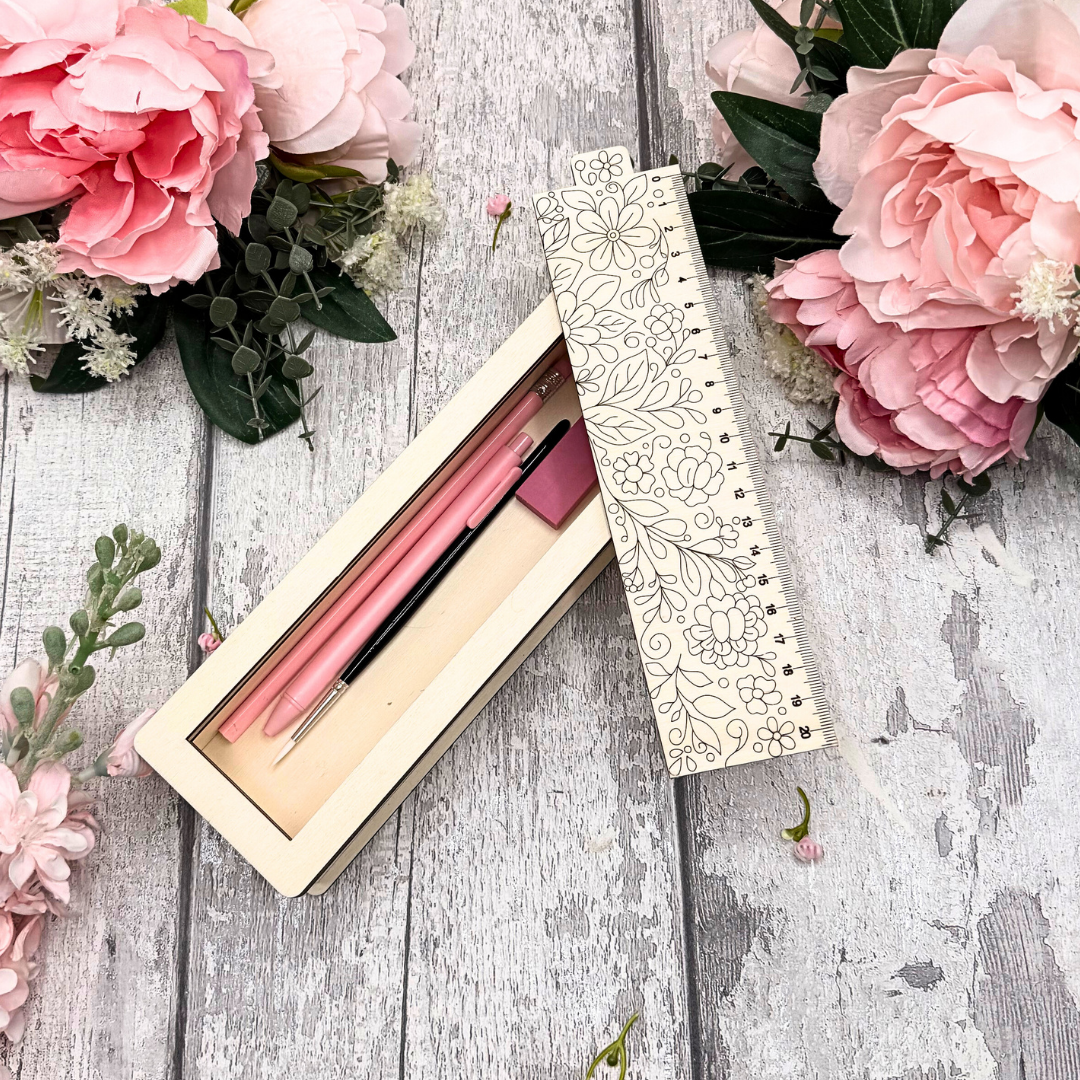
Meet the stationery box that’s just as satisfying to build as it is to use ✨
The Floral Slide & Store Stationery Box is a hands-on wooden craft kit designed to slow things down and spark creativity. Featuring a beautifully detailed paintable floral ruler, this clever design slides open to reveal a hidden compartment for your stationery inside.
Build your box using the included wooden pieces and glue, following a step-by-step YouTube assembly video. Once complete, the box becomes a practical desk companion — perfect for storing pens, pencils, brushes, and little creative essentials.
Paint it, personalise it, use it every day… this is mindful making with a purpose.
How it works:
- The floral ruler slides smoothly to open and close the box
- Hidden storage keeps stationery neat and tidy
- The ruler doubles as a functional measuring tool once assembled
What’s included:
- All laser-cut wooden pieces to build the stationery box
- Paintable floral ruler lid
- Wood glue
- 6x Full size paints
- 1x Paint brush
- Access to a YouTube assembly tutorial
Why you’ll love it:
- A buildable, hands-on wooden craft project
- Paintable floral design for personalisation
- Sliding ruler mechanism for a clever interactive finish
- Practical desk storage once complete
- A calming, creative project with a useful end result
🌸 Build it slowly. Paint it your way. Use it every day. Please do not glaze.


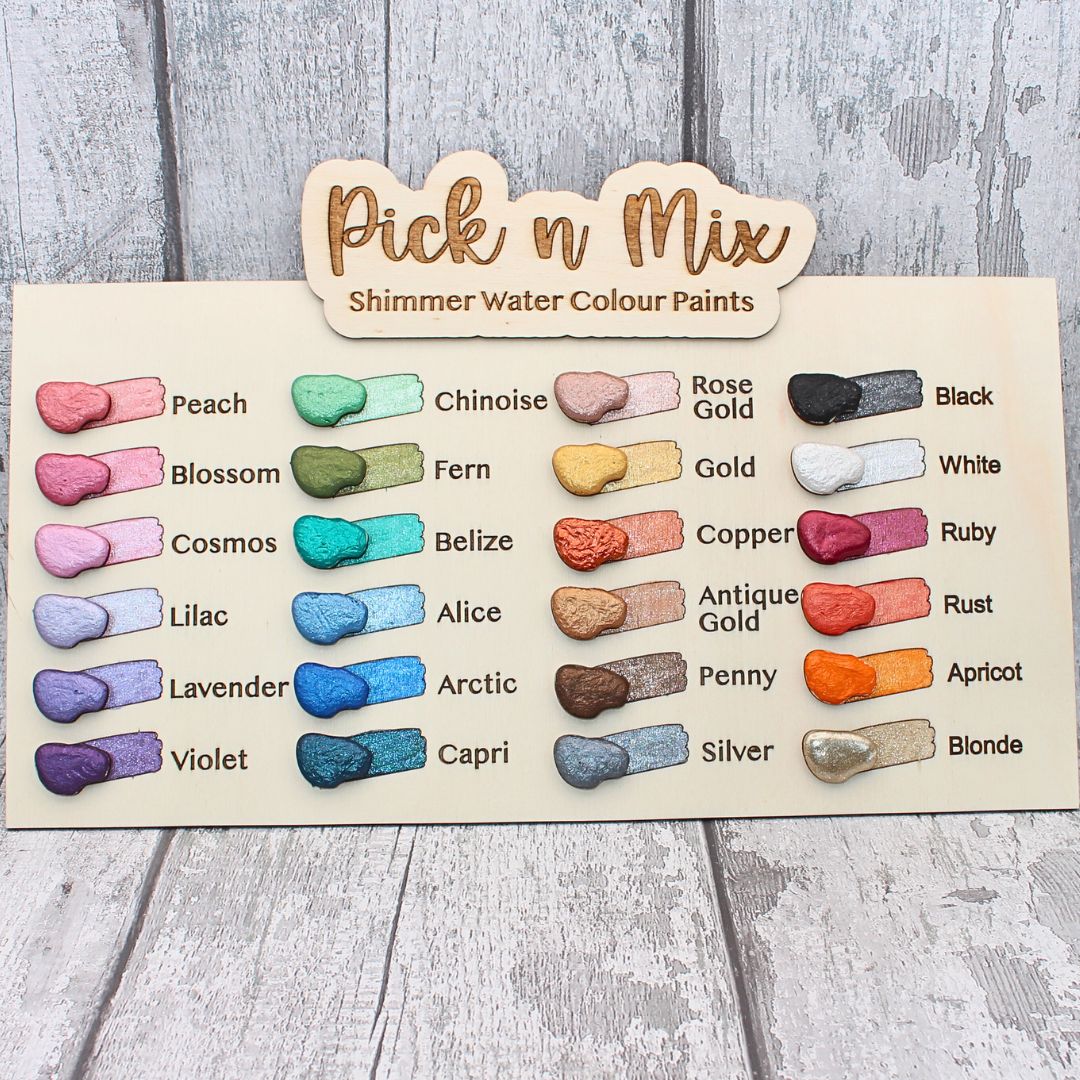
OUR PAINTS ARE SUPER EASY TO USE AND MESS FREE
-
Step 1: Add water
Add a drop of water to the colours you would like to use.
-
Step 2: Swirl your brush in the colour
Swirl your brush until you have a good coverage on your brush.
-
Step 3: Enjoy painting your design
Paint straight onto your wood designs.
-
TOP TIPS
Paint all your pieces before popping them out.DO NOT glaze the "C" shape (this is your hook) and the big ring
MAKE YOUR CRAFTS POP WITH OUR SPECIAL GLAZE
-
Step 1: Put Glaze Upside Down
This avoids bubbles on your beautiful creation.
-
Step 2: Mini LED Light
Plug in Mini LED Light ready for curing
-
Step 3: Add glaze
Add glaze straight from the bottle to your design. Use the nozzle to move the glaze.
-
Step 4: Cure your glaze
Cure for 2 minutes under your Mini LED light.
-
TOP TIPS
Remove any bubbles before curing.You can't over cure the glaze, only under cure it. If it's still "tacky" or soft cure for another minute.
This box was super easy to assemble, lovely to paint and so useful. As always products are so well designed, packaged and sent! Love everything about this company!! Amazing!! 🥰